Wednesday, December 19, 2012
The events last week in Newtown, CT impacted me both as a mother and an educator. When I saw a posting on Facebook I knew I wanted to do this both with my kids at home as well as my students at school.
A building has been designated to house the students from Sandy Hook Elementary School. They are in the process of transporting desks, chairs, supplies and so forth to this location. "The Snowflake Project" is a project for the Sandy Hook students who will return to school after the holidays. The idea is that students, friends and families create and decorate a snowflake. Members of the school will hang them in the hallways of the stark, new building where the Sandy Hook students will be returning. PLEASE NO WORDS! They just want a cheerful, happy, sparkly environment for the students entering the new building. Please pass on to anyone you think may want to participate. When you send your snowflakes, please include a note to tell where they are from (your school, class, town, etc) to display along with your snowflakes. You can send directly to the address below, and they will be given to the PTA. The Snowflake Project c/o Bonny Marsicano 22 Pine Tree Hill Road Newtown, CT 06470 Before mailing your snowflake, please take a moment to send a prayer, wish or happy thought to the children who will receive your snowflake.
Martha Stewart has a nice tutorial here...
martha stewart tutorial
Wednesday, October 17, 2012
Metamorphosis
So... the oldest one came home yesterday and declared he wanted to cut his hair - the famous flow!
He has only had it cut one time at a real hair place - usually it is me and a pair of shears! I didn't think I could give him what he was looking for so we headed to Sports Clips....
I sniffed a little bit as the curls came off but it will be nice to see him without the baseball hat!
Wondering what the kids at school thought today?
Tuesday, September 18, 2012
heading a new direction
I am obsessed with Modern Quilting - this is a mini I recently made for a swap group on flickr.
I also attended the first meeting of the Rochester Modern Quilt Guild - it was awesome!!!
Tuesday, July 10, 2012
Crafty blackbirds soggy block swap on Flickr
So.... I have participated in a few block swaps on Flickr but had yet to make a completed project. When I got my blocks back from the soggy block swap they seemed somehow more manageable so I laid them out in a slightly off center diamond and set to work stitching them together for a pillow topper! As I sewed it was fn to see the different places the blocks had originated....
24 states! 3 continents and 5 countries ! How cool is that.
Wednesday, April 18, 2012
My Baby turns 10!
where has the time gone? seems like yesterday that we were at the doctors office wondering when this baby was going to come...5 days late he made his appearance and on his dad's birthday to boot!
happy birthday Leo!
Sunday, April 15, 2012
pincushion inspiration for flickr swap
just joined my second swap on flickr - pincushions! found these for inspiration for my partner...can't wait to see what inspires the partner I get :)
Thursday, March 01, 2012
Friday, February 24, 2012
this week's challenge is inspired by barn quilts.
Your project must include at least one block that would make a great barn quilt.
Official barn quilts are usually 8 feet square, but you can make yours any size you choose.
The block can be manipulated and/or incorporated into a larger project, or it can stand on its own.
Both the block and the project must have a name. It is OK for the name of each to be the same, but it is not necessary.
so... I put on my thinking cap ... as usual, I could not make a regular quilt but had to "think outside the box" as Kim suggested....
I love barns and I love barn quilts but since we spend more of our near the lake I decided to put a nautical spin on my the barn quilt block in my design.
Name: Little Barn by the Beach
created in Rochester NY
size 18"x18"
I used the first letter of each of our names, K,P,L,E and the signal flags that represent each letter to create a "barn block"
I decided to make a wonky barn/house block incorporating the barn quilt on the front of the barn. I have long loved the wonky house blocks I have seen on flickr .... then I realized that I had 1 afternoon to get my project done as we were heading out of town for a long weekend! Originally I was going to make a small quit for the wall but as I played with colors and fabrics I decided this block would make a perfect pillow for my sons newly redecorated room! He is also my sailor so the signal flags are right up his alley!
I did not have my good machine with the walking foot to quilt this so the quilting was not as fancy as I might have tried but I had fun with it anyways! spikes for the grass, boards on the barn, shingles for the roof, swirls in the sky ....and best of all...he loves it!
Saturday, January 14, 2012
project quilting season 3 - challenge 1
Project Quilting season 3 - challenge 1
"room with a view" - architectural challenge
Kristen Hallagan - Rochester, NY
so.... we were challenged this week to design a quilted entry with architectural inspiration. We were also encouraged to "think outside the box"....so, I attempted to do both!
I was inspired by this flickr photo
[http://www.flickr.com/photos/megan_evans/6663373857/in/faves-gocksfrocks/]
which got me thinking about the architectural element of lattices.... [http://www.flickr.com/photos/gocksfrocks/6691424257/in/photostream]
and.... I got thinking about the challenge to "think outside the box" which led me to design a piece that was quilted but not displayed as a traditional quilted piece might be but rather displayed in a large wooden hoop, as might be used for hand quilting.
I also wanted to incorporate some textural elements which led me to the 3D felted wool flowers that are "growing" on the lattice.
This challenge led to a little lose of sleep as I thought about how I wanted to approach it but in the end I was very pleased with what I came up with - though I think it will be quite different from most of the other entries!
enjoy!
Monday, November 07, 2011
Tuesday, November 01, 2011
suggestions?
yummy new fabrics I could not resist - now I am trying to figure out a block pattern to use - any suggestions??
Wednesday, October 19, 2011
Mollys Crazy Dresden
another amazing quilt spotted on Flickr - check out her photostream for some other gorgeous goodies!
Tuesday, October 18, 2011
Soleil d'automne
oh my word! could this be any more amazing! the quilting is to die for!! the colors are scrumptious - Love everything about it!
Friday, September 30, 2011
Whirl in Scraps from Scrap Republic
how gorgeous is this!! check out her photos on flickr - pure drool worthy!
Monday, September 26, 2011
One of my favorite authors for young people will be coming to our school later in Oct! She has written a wonderful new book telling the story of Salva Dut, one of Sudan's "Lost Boys" and his organization Water For Sudan that is working to raise money to build wells in Southern Sudan.
Water for Sudan from Salva Dut on Vimeo.
Monday, September 19, 2011
My kids love beef & broccoli with oyster sauce so when I was directed to this recipe on Food.Com by the awesome blogger atA Year of Slow Cooking I thought it might be a nice alternative.
I of course, did not get my act together to assemble this before work so it may be a stove top version - or I will try it on high in the crockpot. What ever changes I make - I will be sure to note here.
1 lb beef flank steak, sliced thinly across the grain
1 medium white onions (about 1 cup) or 1 medium yellow onion, sliced thinly (about 1 cup)
1/2 cup light soy sauce or 1/2 cup Braggs liquid aminos
1/2 cup dry sherry
1/2 cup chicken broth
1 tablespoon minced garlic
2 tablespoons hoisin sauce
1/4 cup dark brown sugar
1 tablespoon ground ginger
1/2-1 teaspoon red pepper flakes, to taste
1/4 cup cornstarch
1 cup cut scallion, in 1 . 5 inch pieces (green onions)
1/3 cup fruity white wine
Directions:
1
Slice the flank steak thinly across the grain - the strips should be 2 to 3 inches long each; set aside.
2
Combine the onion, soy sauce, sherry, broth, garlic, hoisin, brown sugar, ginger, and pepper flakes, then put the mixture into the crock pot.
3
Put the cornstarch in a large Ziploc bag; add the sliced beef and toss well to coat.
4
Add the coated beef into the crock pot, gently pushing it into the liquid to cover; pour the white wine over - do NOT stir.
5
Cook on low for 4 to 5 hours; an hour before you're going to serve, turn the crock pot to high, add the cut scallions, stir, and cook for an additional hour.
6
Stir, and serve over rice or noodles.
Friday, September 16, 2011
so the big news in my life is that I have gone back to teaching full time.
This is a bittersweet time for me.
It means a lot less time at the studio but I am still doing some shows this fall that I had signed up for in the spring. on the bright side, the transition back to teaching has been 100x better than I ever could have imagined. I was home for 10 years raising my 3 kids, and could not imagine how I was going to make that leap back to full time teaching. But leap I did and landed in an amazing district, with wonderful students and a welcoming staff.
I also happen to teach an amazing population of kids - ELL's...English Language Learners - children who speak a language other than English at home - and no, I do not know a million other languages. They get all of their instruction in English!
Yesterday I came across a NYTimes article that really puts their experiences in perspective - My Families Experiment in extreme schooling. I shared this with the staff at my school in hopes of enlightening them a bit more to the plight of our newest arrivals. The feedback I got from the staff was heartwarming and confirmed I have made the right decision to step back into teaching.
As for my sewing....I will be heading to the studio tomorrow - filing some orders for etsy, dusting off the machines and playing with my fabrics again. I madly made 100+ new pieces this summer so be on the lookout for those to start popping up in my etsy shop or as special offers on my facebook fanpage!
Thursday, June 23, 2011
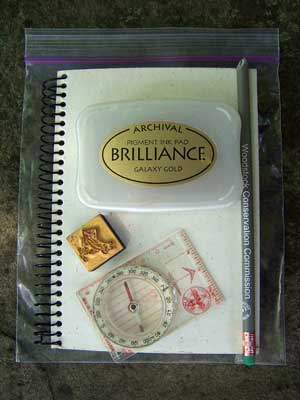
A couple of summers ago I stumbled upon a fun summer activity with the kids - Letterboxing! Similar to geocaching but without the high tech GPS gear. Letterboxers hide small, weatherproof boxes in publicly-accessible places (like parks) and post clues to finding the box online on one of several Web sites. There are close to 20,000 hidden in North America alone! Individual letterboxes usually contain a log book and a rubber stamp(very often hand-carved). Finders make an imprint of the letterbox's stamp on their personal log book, and leave an imprint of their personal stamp on the letterbox's logbook . It originated in England but grew in popularity on this side of the pond after this 1998 article in Smithsonian Magazine.
Here’s the basic idea: Someone hides a waterproof box somewhere outside; it should contain at least a notebook and a carved rubber stamp (it may also include a pen, stamp pad or other small treasures). The hider writes directions to the box (called “clues” or “the map”) and gives them to the finder in person, by mail or online. Clues range from easy to challenging. The hike may be short or long, geared towards novices or advanced hikers of any age.
Find a list of letterboxes online here
Letterboxing with kids is a fun way to discover new places and to explore nature close to home. Once you find the letterbox, stamp the letterbox’s stamp in your notebook, and stamp your stamp in the letterbox’s “logbook”.
Letterboxing has no official rules but rather asks you to use some common sense...
“Leave no trace” - i.e., leave the area as is or in better shape (e.g., by removing litter.)
Reseal the box so contents are protected from the elements.
Replace it in its original location so it is completely hidden from view, to avoid spoiling the fun or making it vulnerable to vandals.
Above all - get outside in the fresh air with your kids and try something new!
Wednesday, May 18, 2011

Tried a new recipe last night from Cooking Light and it was a HUGE hit! My nine year old loved the spicy radish and dijon mustard in the dressing. I loved the fresh spring taste in my mouth - I thought the fennel might be too much but it was spot on! Definitely add this to your list of wonderful summery side salads!
* 8 ounces uncooked orzo (rice-shaped pasta)
* 1 tablespoon kosher salt
* 1/4 cup fresh lemon juice
* 3 tablespoons olive oil
* 1 teaspoon Dijon mustard
* 1/2 teaspoon freshly ground black pepper
* 1 1/2 cups diced fennel (about 1 bulb)
* 1/2 cup chopped radish
* 3 tablespoons chopped fresh mint ( I only had dried and it was fine)
* 3 tablespoons minced green onions ( used chives from my garden - nice light flavor)
* 1/2 teaspoon kosher salt
* 1/3 cup pine nuts, toasted
Preparation
* 1. Cook orzo pasta with 1 tablespoon kosher salt according to the package directions, omitting additional fat. Drain and rinse with cold water. Drain well.
* 2. Combine lemon juice and next 3 ingredients (through pepper) in a large bowl; stir well with a whisk. Add orzo, fennel, and the next 4 ingredients (through 1/2 teaspoon salt); toss well to coat. Cover and chill. Top with nuts before serving.
Rori Trovato, Cooking Light
APRIL 2011