

Project Quilting season 3 - challenge 1
"room with a view" - architectural challenge
Kristen Hallagan - Rochester, NY
so.... we were challenged this week to design a quilted entry with architectural inspiration. We were also encouraged to "think outside the box"....so, I attempted to do both!
I was inspired by this flickr photo
[http://www.flickr.com/photos/megan_evans/6663373857/in/faves-gocksfrocks/]
which got me thinking about the architectural element of lattices.... [http://www.flickr.com/photos/gocksfrocks/6691424257/in/photostream]
and.... I got thinking about the challenge to "think outside the box" which led me to design a piece that was quilted but not displayed as a traditional quilted piece might be but rather displayed in a large wooden hoop, as might be used for hand quilting.
I also wanted to incorporate some textural elements which led me to the 3D felted wool flowers that are "growing" on the lattice.
This challenge led to a little lose of sleep as I thought about how I wanted to approach it but in the end I was very pleased with what I came up with - though I think it will be quite different from most of the other entries!
enjoy!
Saturday, January 14, 2012
project quilting season 3 - challenge 1

Monday, November 07, 2011

Tuesday, November 01, 2011
suggestions?

yummy new fabrics I could not resist - now I am trying to figure out a block pattern to use - any suggestions??
Wednesday, October 19, 2011
Mollys Crazy Dresden

another amazing quilt spotted on Flickr - check out her photostream for some other gorgeous goodies!
Tuesday, October 18, 2011
Soleil d'automne

oh my word! could this be any more amazing! the quilting is to die for!! the colors are scrumptious - Love everything about it!
Friday, September 30, 2011
Whirl in Scraps from Scrap Republic

how gorgeous is this!! check out her photos on flickr - pure drool worthy!
Monday, September 26, 2011
A Long Walk to Water and Linda Sue Park....
One of my favorite authors for young people will be coming to our school later in Oct! She has written a wonderful new book telling the story of Salva Dut, one of Sudan's "Lost Boys" and his organization Water For Sudan that is working to raise money to build wells in Southern Sudan.
One of my favorite authors for young people will be coming to our school later in Oct! She has written a wonderful new book telling the story of Salva Dut, one of Sudan's "Lost Boys" and his organization Water For Sudan that is working to raise money to build wells in Southern Sudan.
Water for Sudan from Salva Dut on Vimeo.
Monday, September 19, 2011
What's for Dinner tonight??
My kids love beef & broccoli with oyster sauce so when I was directed to this recipe on Food.Com by the awesome blogger atA Year of Slow Cooking I thought it might be a nice alternative.
I of course, did not get my act together to assemble this before work so it may be a stove top version - or I will try it on high in the crockpot. What ever changes I make - I will be sure to note here.
1 lb beef flank steak, sliced thinly across the grain
1 medium white onions (about 1 cup) or 1 medium yellow onion, sliced thinly (about 1 cup)
1/2 cup light soy sauce or 1/2 cup Braggs liquid aminos
1/2 cup dry sherry
1/2 cup chicken broth
1 tablespoon minced garlic
2 tablespoons hoisin sauce
1/4 cup dark brown sugar
1 tablespoon ground ginger
1/2-1 teaspoon red pepper flakes, to taste
1/4 cup cornstarch
1 cup cut scallion, in 1 . 5 inch pieces (green onions)
1/3 cup fruity white wine
Directions:
1
Slice the flank steak thinly across the grain - the strips should be 2 to 3 inches long each; set aside.
2
Combine the onion, soy sauce, sherry, broth, garlic, hoisin, brown sugar, ginger, and pepper flakes, then put the mixture into the crock pot.
3
Put the cornstarch in a large Ziploc bag; add the sliced beef and toss well to coat.
4
Add the coated beef into the crock pot, gently pushing it into the liquid to cover; pour the white wine over - do NOT stir.
5
Cook on low for 4 to 5 hours; an hour before you're going to serve, turn the crock pot to high, add the cut scallions, stir, and cook for an additional hour.
6
Stir, and serve over rice or noodles.
My kids love beef & broccoli with oyster sauce so when I was directed to this recipe on Food.Com by the awesome blogger atA Year of Slow Cooking I thought it might be a nice alternative.
I of course, did not get my act together to assemble this before work so it may be a stove top version - or I will try it on high in the crockpot. What ever changes I make - I will be sure to note here.
1 lb beef flank steak, sliced thinly across the grain
1 medium white onions (about 1 cup) or 1 medium yellow onion, sliced thinly (about 1 cup)
1/2 cup light soy sauce or 1/2 cup Braggs liquid aminos
1/2 cup dry sherry
1/2 cup chicken broth
1 tablespoon minced garlic
2 tablespoons hoisin sauce
1/4 cup dark brown sugar
1 tablespoon ground ginger
1/2-1 teaspoon red pepper flakes, to taste
1/4 cup cornstarch
1 cup cut scallion, in 1 . 5 inch pieces (green onions)
1/3 cup fruity white wine
Directions:
1
Slice the flank steak thinly across the grain - the strips should be 2 to 3 inches long each; set aside.
2
Combine the onion, soy sauce, sherry, broth, garlic, hoisin, brown sugar, ginger, and pepper flakes, then put the mixture into the crock pot.
3
Put the cornstarch in a large Ziploc bag; add the sliced beef and toss well to coat.
4
Add the coated beef into the crock pot, gently pushing it into the liquid to cover; pour the white wine over - do NOT stir.
5
Cook on low for 4 to 5 hours; an hour before you're going to serve, turn the crock pot to high, add the cut scallions, stir, and cook for an additional hour.
6
Stir, and serve over rice or noodles.
Friday, September 16, 2011
Life Changes....
so the big news in my life is that I have gone back to teaching full time.
This is a bittersweet time for me.
It means a lot less time at the studio but I am still doing some shows this fall that I had signed up for in the spring. on the bright side, the transition back to teaching has been 100x better than I ever could have imagined. I was home for 10 years raising my 3 kids, and could not imagine how I was going to make that leap back to full time teaching. But leap I did and landed in an amazing district, with wonderful students and a welcoming staff.
I also happen to teach an amazing population of kids - ELL's...English Language Learners - children who speak a language other than English at home - and no, I do not know a million other languages. They get all of their instruction in English!
Yesterday I came across a NYTimes article that really puts their experiences in perspective - My Families Experiment in extreme schooling. I shared this with the staff at my school in hopes of enlightening them a bit more to the plight of our newest arrivals. The feedback I got from the staff was heartwarming and confirmed I have made the right decision to step back into teaching.
As for my sewing....I will be heading to the studio tomorrow - filing some orders for etsy, dusting off the machines and playing with my fabrics again. I madly made 100+ new pieces this summer so be on the lookout for those to start popping up in my etsy shop or as special offers on my facebook fanpage!
so the big news in my life is that I have gone back to teaching full time.
This is a bittersweet time for me.
It means a lot less time at the studio but I am still doing some shows this fall that I had signed up for in the spring. on the bright side, the transition back to teaching has been 100x better than I ever could have imagined. I was home for 10 years raising my 3 kids, and could not imagine how I was going to make that leap back to full time teaching. But leap I did and landed in an amazing district, with wonderful students and a welcoming staff.
I also happen to teach an amazing population of kids - ELL's...English Language Learners - children who speak a language other than English at home - and no, I do not know a million other languages. They get all of their instruction in English!
Yesterday I came across a NYTimes article that really puts their experiences in perspective - My Families Experiment in extreme schooling. I shared this with the staff at my school in hopes of enlightening them a bit more to the plight of our newest arrivals. The feedback I got from the staff was heartwarming and confirmed I have made the right decision to step back into teaching.
As for my sewing....I will be heading to the studio tomorrow - filing some orders for etsy, dusting off the machines and playing with my fabrics again. I madly made 100+ new pieces this summer so be on the lookout for those to start popping up in my etsy shop or as special offers on my facebook fanpage!
Thursday, June 23, 2011
Letterboxing 101
A couple of summers ago I stumbled upon a fun summer activity with the kids - Letterboxing! Similar to geocaching but without the high tech GPS gear. Letterboxers hide small, weatherproof boxes in publicly-accessible places (like parks) and post clues to finding the box online on one of several Web sites. There are close to 20,000 hidden in North America alone! Individual letterboxes usually contain a log book and a rubber stamp(very often hand-carved). Finders make an imprint of the letterbox's stamp on their personal log book, and leave an imprint of their personal stamp on the letterbox's logbook . It originated in England but grew in popularity on this side of the pond after this 1998 article in Smithsonian Magazine.

Here’s the basic idea: Someone hides a waterproof box somewhere outside; it should contain at least a notebook and a carved rubber stamp (it may also include a pen, stamp pad or other small treasures). The hider writes directions to the box (called “clues” or “the map”) and gives them to the finder in person, by mail or online. Clues range from easy to challenging. The hike may be short or long, geared towards novices or advanced hikers of any age.
Find a list of letterboxes online here
Letterboxing with kids is a fun way to discover new places and to explore nature close to home. Once you find the letterbox, stamp the letterbox’s stamp in your notebook, and stamp your stamp in the letterbox’s “logbook”.
Letterboxing has no official rules but rather asks you to use some common sense...
“Leave no trace” - i.e., leave the area as is or in better shape (e.g., by removing litter.)
Reseal the box so contents are protected from the elements.
Replace it in its original location so it is completely hidden from view, to avoid spoiling the fun or making it vulnerable to vandals.
Above all - get outside in the fresh air with your kids and try something new!
A couple of summers ago I stumbled upon a fun summer activity with the kids - Letterboxing! Similar to geocaching but without the high tech GPS gear. Letterboxers hide small, weatherproof boxes in publicly-accessible places (like parks) and post clues to finding the box online on one of several Web sites. There are close to 20,000 hidden in North America alone! Individual letterboxes usually contain a log book and a rubber stamp(very often hand-carved). Finders make an imprint of the letterbox's stamp on their personal log book, and leave an imprint of their personal stamp on the letterbox's logbook . It originated in England but grew in popularity on this side of the pond after this 1998 article in Smithsonian Magazine.
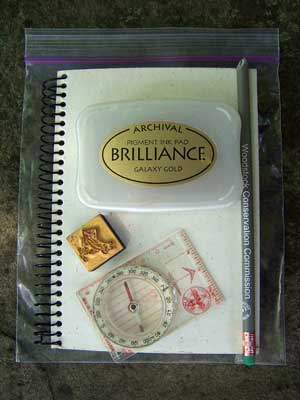
Here’s the basic idea: Someone hides a waterproof box somewhere outside; it should contain at least a notebook and a carved rubber stamp (it may also include a pen, stamp pad or other small treasures). The hider writes directions to the box (called “clues” or “the map”) and gives them to the finder in person, by mail or online. Clues range from easy to challenging. The hike may be short or long, geared towards novices or advanced hikers of any age.
Find a list of letterboxes online here
Letterboxing with kids is a fun way to discover new places and to explore nature close to home. Once you find the letterbox, stamp the letterbox’s stamp in your notebook, and stamp your stamp in the letterbox’s “logbook”.
Letterboxing has no official rules but rather asks you to use some common sense...
“Leave no trace” - i.e., leave the area as is or in better shape (e.g., by removing litter.)
Reseal the box so contents are protected from the elements.
Replace it in its original location so it is completely hidden from view, to avoid spoiling the fun or making it vulnerable to vandals.
Above all - get outside in the fresh air with your kids and try something new!
Wednesday, May 18, 2011
Yum!

Tried a new recipe last night from Cooking Light and it was a HUGE hit! My nine year old loved the spicy radish and dijon mustard in the dressing. I loved the fresh spring taste in my mouth - I thought the fennel might be too much but it was spot on! Definitely add this to your list of wonderful summery side salads!
* 8 ounces uncooked orzo (rice-shaped pasta)
* 1 tablespoon kosher salt
* 1/4 cup fresh lemon juice
* 3 tablespoons olive oil
* 1 teaspoon Dijon mustard
* 1/2 teaspoon freshly ground black pepper
* 1 1/2 cups diced fennel (about 1 bulb)
* 1/2 cup chopped radish
* 3 tablespoons chopped fresh mint ( I only had dried and it was fine)
* 3 tablespoons minced green onions ( used chives from my garden - nice light flavor)
* 1/2 teaspoon kosher salt
* 1/3 cup pine nuts, toasted
Preparation
* 1. Cook orzo pasta with 1 tablespoon kosher salt according to the package directions, omitting additional fat. Drain and rinse with cold water. Drain well.
* 2. Combine lemon juice and next 3 ingredients (through pepper) in a large bowl; stir well with a whisk. Add orzo, fennel, and the next 4 ingredients (through 1/2 teaspoon salt); toss well to coat. Cover and chill. Top with nuts before serving.
Rori Trovato, Cooking Light
APRIL 2011

Tried a new recipe last night from Cooking Light and it was a HUGE hit! My nine year old loved the spicy radish and dijon mustard in the dressing. I loved the fresh spring taste in my mouth - I thought the fennel might be too much but it was spot on! Definitely add this to your list of wonderful summery side salads!
* 8 ounces uncooked orzo (rice-shaped pasta)
* 1 tablespoon kosher salt
* 1/4 cup fresh lemon juice
* 3 tablespoons olive oil
* 1 teaspoon Dijon mustard
* 1/2 teaspoon freshly ground black pepper
* 1 1/2 cups diced fennel (about 1 bulb)
* 1/2 cup chopped radish
* 3 tablespoons chopped fresh mint ( I only had dried and it was fine)
* 3 tablespoons minced green onions ( used chives from my garden - nice light flavor)
* 1/2 teaspoon kosher salt
* 1/3 cup pine nuts, toasted
Preparation
* 1. Cook orzo pasta with 1 tablespoon kosher salt according to the package directions, omitting additional fat. Drain and rinse with cold water. Drain well.
* 2. Combine lemon juice and next 3 ingredients (through pepper) in a large bowl; stir well with a whisk. Add orzo, fennel, and the next 4 ingredients (through 1/2 teaspoon salt); toss well to coat. Cover and chill. Top with nuts before serving.
Rori Trovato, Cooking Light
APRIL 2011
Monday, May 02, 2011
{Modern 12} Bee - wonky square string block
I designed this block for my online BEE with the {modern 12} group on flickr. I was inspired by this block from Janesfabrics on flickr and decided to create my own version that could be replicated by the other members in my bee.
This is the block I ended up designing... instruction follow below.

For the center square I decided to use the paper piecing method to make the string block - this was a first time for me!
I decided to make my center square 8 1/2". I cut my patterned aqua, pink & red fabrics into strips ranging from 1"-1 3/4". Mine were cut straight but I think I will cut some wonky for my next set of squares.
I picked my first 2 strips that would become the center and one next to it and stitched them right sides together with the center strip placed wrong side down across the diagonal center of the paper square. The strips should be long enough to go over the edges of the paper square. Align the edges and sew with a 1/4″ seam allowance. Stitch through paper and 2 layers of fabric. *** Important - decrease stitch length so that the stitches perforate the paper square *** This will allow you to easily remove the paper from the back later. My machine is typically set at 2.5 – I’ve found that reducing it to 1.5 works well.
Press the strips flat and choose your next strip to attach.

continue adding strips, pressing flat after stitching until you’ve covered the entire paper square. It will look something like this.

Flip the square over and trim - ( do you liek the scrap paper I used for my block!)

if you want a wonky square, do not cut right angles at the corners

note - top edge - the ruler starts at the corner, angels up to create a wonky square.

paper is a perfect 8 1/2" square, string block is a wonky square.
remove the paper before adding the outer border! If you’ve reduced the stitch length, the paper should appear almost perforated. I fold the paper along the stitch line and then tear away.

To make the block a finished 12 1/2" I next cut solid red kona into 3 1/2" strips and attached them to the edges of the string square. I placed the string square facedown on the red fabric so that I could be sure the seams stiched down properly as I sewed across them.

Press the seams towards the red fabric. Turn over and trim using your 12 1/2" square ruler. I turned the ruler to help create the wonky look I was after.

and you are done!

I plan to sash this quilt in white once my squares have been received. I will keep you posted on my progress!
I designed this block for my online BEE with the {modern 12} group on flickr. I was inspired by this block
from Janesfabrics on flickr and decided to create my own version that could be replicated by the other members in my bee.This is the block I ended up designing... instruction follow below.
For the center square I decided to use the paper piecing method to make the string block - this was a first time for me!
I decided to make my center square 8 1/2". I cut my patterned aqua, pink & red fabrics into strips ranging from 1"-1 3/4". Mine were cut straight but I think I will cut some wonky for my next set of squares.
I picked my first 2 strips that would become the center and one next to it and stitched them right sides together with the center strip placed wrong side down across the diagonal center of the paper square. The strips should be long enough to go over the edges of the paper square. Align the edges and sew with a 1/4″ seam allowance. Stitch through paper and 2 layers of fabric. *** Important - decrease stitch length so that the stitches perforate the paper square *** This will allow you to easily remove the paper from the back later. My machine is typically set at 2.5 – I’ve found that reducing it to 1.5 works well.
Press the strips flat and choose your next strip to attach.
continue adding strips, pressing flat after stitching until you’ve covered the entire paper square. It will look something like this.
Flip the square over and trim - ( do you liek the scrap paper I used for my block!)
if you want a wonky square, do not cut right angles at the corners
note - top edge - the ruler starts at the corner, angels up to create a wonky square.
paper is a perfect 8 1/2" square, string block is a wonky square.
remove the paper before adding the outer border! If you’ve reduced the stitch length, the paper should appear almost perforated. I fold the paper along the stitch line and then tear away.
To make the block a finished 12 1/2" I next cut solid red kona into 3 1/2" strips and attached them to the edges of the string square. I placed the string square facedown on the red fabric so that I could be sure the seams stiched down properly as I sewed across them.
Press the seams towards the red fabric. Turn over and trim using your 12 1/2" square ruler. I turned the ruler to help create the wonky look I was after.
and you are done!
I plan to sash this quilt in white once my squares have been received. I will keep you posted on my progress!
Wednesday, April 27, 2011


Tuesday, April 26, 2011
I am in love.....
with siggi's that is!

I have always been a fan of greek style yogurt and while grocery shopping late last night the gorgeous packaging of Siggi's yogurt caught my eye...I had to give it a try!

I opted for orange ginger .... a flavor never before encountered in yogurt and now my favorite! I wished the container had been twice the size! Not only is this yogurt delicious - it is good for you too! And an added bonus for me it is "local" - made in Chenango County NY! Siggi buys milk from local family farms that grass feed their cows and do not inject them with any type of growth hormones. It is sweetened with agave nectar rather than artificial sweeteners or high fructose corn syrup.
The packaging has also been designed with a nod to the environment...Late in 2007, siggi’s skyr launches a new cup design that uses 40-50% less plastic than regular yogurt cups and is supported by a recyclable cardboard sleeve.
I had luck finding it at wegmans and their website lets you enter your zip code to find a retailer near you! You can also LIKE them on facebook...siggi's on facebook
Let me know if you try it - I would love to hear what you think!
with siggi's that is!

I have always been a fan of greek style yogurt and while grocery shopping late last night the gorgeous packaging of Siggi's yogurt caught my eye...I had to give it a try!

I opted for orange ginger .... a flavor never before encountered in yogurt and now my favorite! I wished the container had been twice the size! Not only is this yogurt delicious - it is good for you too! And an added bonus for me it is "local" - made in Chenango County NY! Siggi buys milk from local family farms that grass feed their cows and do not inject them with any type of growth hormones. It is sweetened with agave nectar rather than artificial sweeteners or high fructose corn syrup.
The packaging has also been designed with a nod to the environment...Late in 2007, siggi’s skyr launches a new cup design that uses 40-50% less plastic than regular yogurt cups and is supported by a recyclable cardboard sleeve.
I had luck finding it at wegmans and their website lets you enter your zip code to find a retailer near you! You can also LIKE them on facebook...siggi's on facebook
Let me know if you try it - I would love to hear what you think!
Thursday, April 14, 2011
Kimberly V Photography: Shooting in Denver
Kimberly V Photography: Shooting in Denver: "We just got back from Denver where we had a GREAT time shooting some clothing lines and visiting Uncle Matt. I spent the day shooting ..."
check out this little video made on a recent gock's frocks photo shoot in Denver!
check out this little video made on a recent gock's frocks photo shoot in Denver!
Monday, March 28, 2011
Do you remember when....
as a child the mere site of a new box of 64 count crayola crayons could set my heart a thumping....cracking it open, selecting that first color....so many colors to choose from. It was heaven!

now... my heart starts beating faster when I catch a glimpse of this....

oh how I wish that this arrived in my mailbox... I would create some amazing new designs .... too bad christmas is so many months away!
as a child the mere site of a new box of 64 count crayola crayons could set my heart a thumping....cracking it open, selecting that first color....so many colors to choose from. It was heaven!

now... my heart starts beating faster when I catch a glimpse of this....

oh how I wish that this arrived in my mailbox... I would create some amazing new designs .... too bad christmas is so many months away!
Sunday, March 27, 2011
Project Quilting - the Final Challenge
I have been playing along a bit in some of Kim's Project Quilting challenges and decided to try the final challenge ... we had to use a large print and a stripe or plaid!
I decided to take inspiration from some of the gorgeous modern quilting photos I have seen on flickr and other quilting blogs and decided to use some of my favorite martha Negley geranium print with kona white cotton. As some of you may know I am new to the quilting world and each foray into quilting teaches me something new!

I originally thought I would create a series of 12" blocks for a table runner... made my first, made my second...laid them next to each other - didn't like the proportions so I sliced one of them in half - or thereabouts, and attached it to the first block!

see..I had just learned something - you don't HAVE to create a quilt in a series of blocks - mine became much more free form .. I sliced and chopped and added new bits and bobs as I went along.

For the stripe requirement, I cut a stripe fabric along the bias to make my quilt binding and I also quilted it using a series of linear lines that created a striped effect on the tablerunner.

more pics can be seen on flickr
and stop by Kim's Blog to see all the entries and cast your vote for your favorite!
I have been playing along a bit in some of Kim's Project Quilting challenges and decided to try the final challenge ... we had to use a large print and a stripe or plaid!
I decided to take inspiration from some of the gorgeous modern quilting photos I have seen on flickr and other quilting blogs and decided to use some of my favorite martha Negley geranium print with kona white cotton. As some of you may know I am new to the quilting world and each foray into quilting teaches me something new!
I originally thought I would create a series of 12" blocks for a table runner... made my first, made my second...laid them next to each other - didn't like the proportions so I sliced one of them in half - or thereabouts, and attached it to the first block!
see..I had just learned something - you don't HAVE to create a quilt in a series of blocks - mine became much more free form .. I sliced and chopped and added new bits and bobs as I went along.
For the stripe requirement, I cut a stripe fabric along the bias to make my quilt binding and I also quilted it using a series of linear lines that created a striped effect on the tablerunner.
more pics can be seen on flickr
and stop by Kim's Blog to see all the entries and cast your vote for your favorite!
Friday, March 11, 2011
Delicious Dinner Idea!
I had to share last nights recipes with you as my 8 year old said "If you make this everyday I will eat it!"
From Bon Appetit - the asparagus on the cover caught my eye!

Ingredients
* 12 ounces fettuccine or penne
* 3 ounces pancetta or bacon, chopped
* 1 1/4 pounds asparagus, trimmed, cut on diagonal into 1-inch pieces
* 2 cups shelled fresh green peas, blanched 1 minute in boiling water, drained, or frozen peas (do not thaw)
* 1 bunch green onions, thinly sliced, white and pale green parts separated from dark green parts
* 2 garlic cloves, pressed
* 1/2 cup finely grated Parmesan cheese plus additional for serving
* 1/3 cup heavy whipping cream
* 3 tablespoons extra-virgin olive oil
* 3 tablespoons fresh lemon juice
* 1 tablespoon finely grated lemon peel
* 1/4 cup chopped fresh Italian parsley, divided
* 1/4 cup thinly sliced fresh basil, divided
I also added some thinly sliced chicken breast for a bit more protein!
Preparation
Cook pasta in pot of boiling salted water until just tender but still firm to bite. Drain, reserving 1/2 cup pasta cooking liquid. Return pasta to pot.
*
Meanwhile, cook pancetta in large nonstick skillet over medium heat until crisp. Using slotted spoon, transfer pancetta to paper towels to drain. Pour off all but 1 teaspoon drippings from skillet. Add asparagus to drippings in skillet; sauté 3 minutes. Add peas, white and pale green parts of green onions, and garlic; sauté until vegetables are just tender, about 2 minutes. Remove from heat.
*
Add vegetable mixture, 1/4 cup pasta cooking liquid, dark green parts of green onions, 1/2 cup Parmesan, cream, olive oil, lemon juice, lemon peel, half of parsley, and half of basil to pasta. Toss, adding more cooking liquid by tablespoonfuls if needed. Season with salt and freshly ground black pepper. Transfer to large bowl. Sprinkle pancetta, remaining parsley, and basil over. Serve, passing additional Parmesan cheese.
I had to share last nights recipes with you as my 8 year old said "If you make this everyday I will eat it!"
From Bon Appetit - the asparagus on the cover caught my eye!

Ingredients
* 12 ounces fettuccine or penne
* 3 ounces pancetta or bacon, chopped
* 1 1/4 pounds asparagus, trimmed, cut on diagonal into 1-inch pieces
* 2 cups shelled fresh green peas, blanched 1 minute in boiling water, drained, or frozen peas (do not thaw)
* 1 bunch green onions, thinly sliced, white and pale green parts separated from dark green parts
* 2 garlic cloves, pressed
* 1/2 cup finely grated Parmesan cheese plus additional for serving
* 1/3 cup heavy whipping cream
* 3 tablespoons extra-virgin olive oil
* 3 tablespoons fresh lemon juice
* 1 tablespoon finely grated lemon peel
* 1/4 cup chopped fresh Italian parsley, divided
* 1/4 cup thinly sliced fresh basil, divided
I also added some thinly sliced chicken breast for a bit more protein!
Preparation
Cook pasta in pot of boiling salted water until just tender but still firm to bite. Drain, reserving 1/2 cup pasta cooking liquid. Return pasta to pot.
*
Meanwhile, cook pancetta in large nonstick skillet over medium heat until crisp. Using slotted spoon, transfer pancetta to paper towels to drain. Pour off all but 1 teaspoon drippings from skillet. Add asparagus to drippings in skillet; sauté 3 minutes. Add peas, white and pale green parts of green onions, and garlic; sauté until vegetables are just tender, about 2 minutes. Remove from heat.
*
Add vegetable mixture, 1/4 cup pasta cooking liquid, dark green parts of green onions, 1/2 cup Parmesan, cream, olive oil, lemon juice, lemon peel, half of parsley, and half of basil to pasta. Toss, adding more cooking liquid by tablespoonfuls if needed. Season with salt and freshly ground black pepper. Transfer to large bowl. Sprinkle pancetta, remaining parsley, and basil over. Serve, passing additional Parmesan cheese.
Thursday, March 10, 2011
New for spring!
I have been listing some delightful new spring offerings for women & girls in my etsy shop...
Serenity Garden came about as a customer request from a customer...

she also inspired Strawberry Fields

and for the big girls - 2 new yoga waist skirts...also the result of custom orders from a customer headed to Hawaii on vacation!
Celadon Garden .. also avail in girls sizes :)

and to be listed later this morning.... Meadowsweet yoga waist skirt

Pop over to the shop and check them out! Have an idea for your own custom - let me know and we will work on something special just for you!
I have been listing some delightful new spring offerings for women & girls in my etsy shop...
Serenity Garden came about as a customer request from a customer...
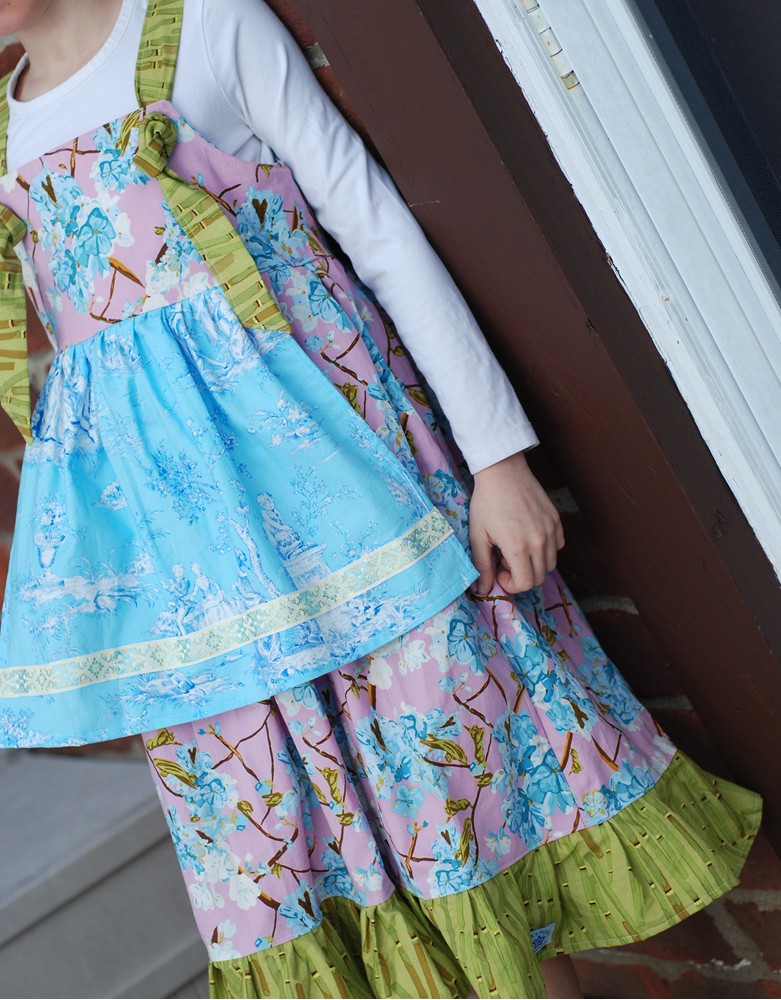
she also inspired Strawberry Fields
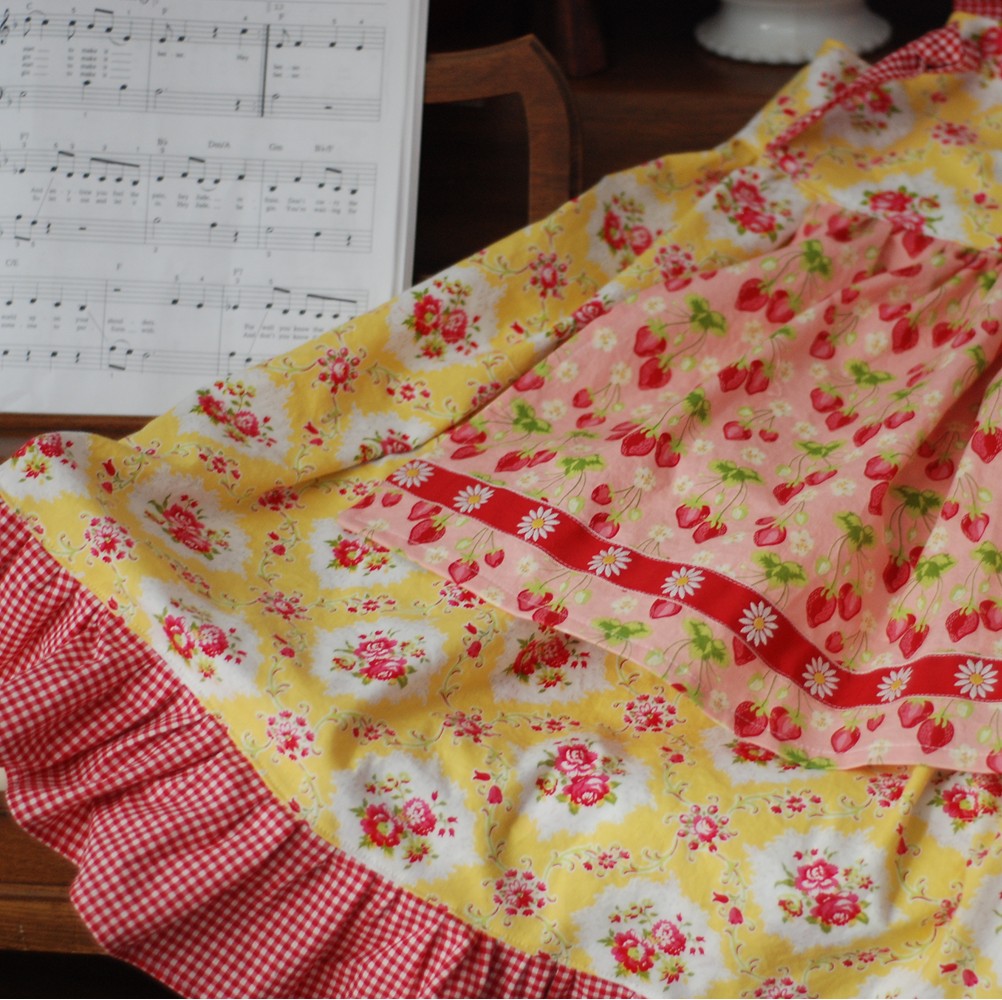
and for the big girls - 2 new yoga waist skirts...also the result of custom orders from a customer headed to Hawaii on vacation!
Celadon Garden .. also avail in girls sizes :)

and to be listed later this morning.... Meadowsweet yoga waist skirt

Pop over to the shop and check them out! Have an idea for your own custom - let me know and we will work on something special just for you!
Tuesday, February 22, 2011
Spring has Sprung....well almost
the urge to spring clean is creeping up on me and with that always comes the urge to purge, rearrange, organize....you get the picture.
I have so many things I would love to change at the house it is a matter of prioritizing and figuring out what is do-able.
One thing I am looking for at are flat panel TV stands. I really like this one...

also on my list is to remove the wallpaper in Leo's room - we hung it 14 years ago and it's time has come to be replaced! Any tips for painless wallpaper removal?? Wouldn't it be nice if it just peeled off like this....

unfortunately I have the feeling it will be more like this...

the urge to spring clean is creeping up on me and with that always comes the urge to purge, rearrange, organize....you get the picture.
I have so many things I would love to change at the house it is a matter of prioritizing and figuring out what is do-able.
One thing I am looking for at are flat panel TV stands. I really like this one...

also on my list is to remove the wallpaper in Leo's room - we hung it 14 years ago and it's time has come to be replaced! Any tips for painless wallpaper removal?? Wouldn't it be nice if it just peeled off like this....

unfortunately I have the feeling it will be more like this...

Subscribe to:
Posts (Atom)



 Posts
Posts


